Succulent Planter

This weekend I was at a garage sale and found an old tin lunch box, maybe 1950’s era. I wasn’t sure exactly what I wanted to do with it but I bought it anyways. While I was at Lowes today I was walking through the outdoor section and found these beautiful succulents. Ding! I had an idea to use the lunch box as a planter.

These were the ones that I picked because I loved the color and shapes. I wanted to have a variety of high and low…

IMG_5786

Here is the lunch tin…

IMG_5788


Steps to Follow:

  1. You will need to get some pea gravel or small rocks to layer on the bottom. Succulents HATE when their roots sit in water and without this tin having drainage it was very important to add a good amount of gravel.
  2. Add potting soil about to make it about 1/3 full.
  3. Play around with the plants and see where you want to plant them. I found that starting with the bigger was easier and then I went back to add the smaller ones.
  4. Finish with more potting soil so what all the succulents are packed tight.
  5. Water and set somewhere that has plenty of sunlight.

As you can see from my plant photos I purchased one to many so I have find somewhere else for that little guy to go! I just love the little white fuzzy balls.

Finished product…

IMG_5792


DIY Window Medicine Cabinet

Have a bunch of old windows laying around like I do? This tutorial will show you how to easily make a cabinet using an old window! It was one of the finishing touched for our newly remodeled bathroom.

Here is what you need:

  • a window (the one I used was a 6 pane)
  • hinges
  • multiple sized screws and drill
  • a nail gun
  • wood glue
  • level surface
  • lumber ( the sizes you get will depend on how big your window is and how deep you want to make it)
  • knob
  • stain and paint

Steps:

  1. You will want to first make the frame for the cabinet. We used 1×6’s and measured to fit the outside of the window so it would close tightly. You essentially are making a box. Use the wood glue to join two pieces together and then using the nail gun nail into place. Let dry for the recommended time. I waited a few days because we were got busy with other things.
  2. Attach the window using the hinges. I would suggested using two, one on the top and bottom.
  3. You will then measure your box to cut the wood for the shelves. Keep in mind that if your window sits deeper you will need to make the width of your shelf smaller so it can open and close properly. We added two shelves using a 1×3.
  4. Once the frame, door, and shelves are attached you will want to add the back. If you have a table saw you would want to get a piece of plywood and measure and cut to fit the back so it is all one piece. If you are like me and do not have a table saw you will want to search your scrape wood stock pile and piece together boards until they fit the back. we screwed these in because we wanted the extra support for when it would get hung.
  5. Now you should have a window cabinet! We wanted ours to look old and distressed so I used a stain all over the new wood, let it dry, and then white washed everything.
  6. To hang it on your wall you can do whatever you would like. We just used 2 inch screws and inserted them right into the wall.

Here is the finished product!

IMG_5784 IMG_5785

I need to get some more things to add to my cabinet.


Farm Style Bathroom Remodel

Our upstairs bathroom has been an ongoing project ever since we moved into our house in 2014. It was honestly just a mess with the colors, poor tile job, and weird plumbing. The vanity took over half the bathroom leaving very little room to actually use the toilet!

IMG_5557

My husband and I did a quick fix to make is usable to our standards and with little money. Unfortunately, I did not take a photo of it complete but from photo taken during the installation of the tile you can see that we took out the yucky wall color and board and added new white bead board. My husband HATED the new wall color (Sea Foam by Valspar)  and said it was “too girly”. During the first small renovation we decided to add exposed copper plumbing to give it more of an industrial look. (I will get better at taking progression photos)

IMG_5467

OKAY… So now onto the actual full renovation to turn this upstairs bath into a shabby chic farm style bathroom!

Let me just say that hammering the old tile away and then chipping out the old thin set was probably my all time LEAST favorite thing I’ve done yet to my house. I’m talking 6 hours of using a hammer and chisel, it makes me cringe just thinking about it. We should have purchased an air chisel so FYI to anyone reading this do yourself a favor and spend the extra $60. Also, how cute is my tub?! It was made in 1915 (we saw this on the bottom of the tub) and was original to the house.

IMG_5450 IMG_5448

Laying the tile and grouting was the easy part. It was a little trouble some when we had to make the cuts around the plumbing but my husband is the master tile cutter and figured it out.

IMG_5457

As you can see from the photo above, the vent pipe was not behind the wall which really bothered me. I came up with the idea of building a wood box around it, to look like a beam, and attaching a shelf running horizontal across the wall.

FullSizeRender (1)

Tah dah! Now on to my most favorite part yet time consuming part. SHIP LAP! I don’t know what it is about ship lap but I am obsessed with it. Now, it isn’t real ship lap because a piece of that stuff is like $8.50! From looking on Pinterest and other blogs I found a DIY way to get the ship lap look. I did have to stray from my favorite store Lowes and head to Home Depot to get what I needed. We used 6 4×8 pieces of pine underlay ($13.77 a piece) and had them cut it into 6 inch strips. Lets just say we weren’t there favorite people but my husband did help the man and he didn’t charge us for any of the cuts! (We need to buy a table saw) Once we got them home it was time to start hanging them. We used a full piece, half, and quarter pattern to offset the rows. A nickel also comes in handy for a spacer. NOTE: I DID PAINT THE WALLS A DARK GREY THAT I HAD LAYING AROUND SO THE GREEN DIDN’T SHOW THROUGH.

FullSizeRender (2)

This took us a few days, working in between our jobs. When it was finished I did prime it with Valspar wall primer in white. The paint color I chose and LOVE was Benjamin Moore Simply White and put two coats on.

At times I wanted to cry and give up because I was just SO OVER working on this room but I couldn’t be happier with the finished product. What a before and after. The window you see on the wall will be made into a medicine cabinet to hang! Check the blog for a tutorial in a few weeks.

FullSizeRender (3) FullSizeRender (4)


Farm Style Dining Room Table

I have been wanting to build my own dining room table ever since we moved into our new home. We have a very large space that connects the living room to the kitchen and it needed to be filled with a decent size table to look right. At first, I was looking for a used table to strip and paint again but had no luck. The tables were either to expensive or to small. After searching the web,  I came across a DIY farm style table. I fell in love. I tweaked mine somewhat to make it the size I needed and with the help of my Fiance we built our own table! Below are the steps that we took to complete this project!

My table ended up measuring 4’x8′ and 31 inches tall.

What You Will Need:

4 1″x12″x8′ pine lumber

4 2″x4″x8′

4 table legs (Lowes has them but you can also find them online) They measured 35″ so we had to cut them down.

2 1/2 inch box of screws

3 inch box of screws

Drill

Chop saw or Circular saw

Wood putty

Sander with 100 grit paper

Level and a flat surface!


The first thing that we did was lay out the boards for the top of the table to see which order they fit best. Some pieces didn’t fit well together and would leave gaps. I ended up having a space between one of my boards but I thought it added to the rustic look I was going for. Anyways, number the boards 1-4 so you can remember which order they go in.

photo 1
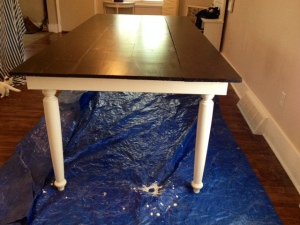
Here is a picture of all the boards laid down. You may also notice that we build this table inside. My doors are very narrow being that my house is older so I was nervous that if built outside, we wouldn’t be able to get it inside. Bryan used the top of the table to measure out the start of the frame. (DO NOT SCREW ANYTHING TO THE TOP YET) He used the 3 of the 2×4’s to make the lip of the table. We decided on leaving a 2″ lip all the way around. You can obviously change this to whatever you would like.

photo 2photo 3

Once the frame/lip were attached with screws we added the legs. (This is the part where we found out the table would be WAY too high so we had to cut them down 5 inches) Double check to make sure that everything is still square before adding the legs.

photo 4

Once the legs are attached to the frame, you will need to add the boards in the correct order and lay the frame on top. Again, you will need to measure to make sure that everything is square. You will then use the last of the 2×4 and cut pieces to fit for the middle supports. Your measurements may vary from mine depending on the size of the table and lip you left. Attach the supports to the table top but be very careful to use the right size screw and to not go through the top!

photo 1(1)

After all that hard work, we had to go back through and fill in the screw holes with wood putty. I have never used this stuff before making our table. Make sure to buy stain-able wood putty! We found ours at Lowes for $8.99 and it was Elmers brand. The holes that need filled are deep we had to allow 24 hours to dry before sanding. Make sure to double check that all the holes are filled. This would also be a time to fill in any cracks on the table top.

Once we waited the recommend 24 hours, I sanded away at this thing . This is where I got very sad I decided to make this inside my house, because if you have ever sanded you know dust gets EVERYWHERE. I had to hang sheets over everything to box myself in. Sand in the direction of the grain? All the tutorials I read kept saying that and honestly I have no idea how to tell the direction of the grain. I just wanted a smooth table that wouldn’t give me splinters or feel rough. To add some age to the table make sure to sand the hard edges down along the outside of the time.

Sanding was completed and I had to now wipe off the table to remove any dust that was left and then vacuum my entire first floor.

photo 2(1)photo 3(1)

I chose to stain the top of the table a dark brown. The stain I used was Rustoleum brand called “Kona”. This went on so easy! I brushed it on in small sections and then wiped it. It only called for one coat of stain so I was done in about 30 minutes. I let dry over night. (If you do this inside, like I did, make sure you have good ventilati0n) For the legs and frame I made my own chalkpaint and used a color from Lowes called “Martha White”. I will be making a separate blog post explaining how I make my chalkpaint.

After the legs were dry I then started to add the polyurethane. I used a Rustoleum brand that had a satin finish. It called for 3 coats and then a 7 days cure period. I was like WHAT? 7 days?!? I did as followed but I honestly think I could have used it at day 3.

The table came out beautiful and I cannot wait until I can host dinners at my house and actually have a space that can seat 8 people! We are going to be making a bench that will seat 3 people for the one side and I am in search of chairs to paint for the remaining 5 seats. I will be posting the bench directions as soon as we find time to make it!


About Time

It finally hit me that, rather than flood my Facebook and Instagram with photos of this project and that project, I should make my own DIY blog. My Fiance and I just bought a house this year and with that comes more expenses… and less spending money. I have always been creative and found ways to save money here and there but decorating a house can be SO expensive. I always think so myself… Why would I spend that much on something when I could just make it? Yes, some projects do require a certain amount of time and elbow grease but in the end you can look at whatever it is that you’ve created and say I made that. That is actually probably half the reason I like to DIY because I know I made it. I can’t take all the credit though because I do get my inspiration from sites like Pinterest. I am hoping this blog will be a guide to some of you on the projects that I am doing or have done and maybe they will inspire you to make something yourself.